That is what it feels like at my house right about now. Pookie Doo’s birthday is less than a month away but party planning began a few months back . Just wanted to give you a sneak peak @ one of the pink-a-licious crafts! I’m adore almost anything ruffle-y.
Showing posts with label crafts. Show all posts
Showing posts with label crafts. Show all posts
Pink-a-palooza!


Fancied up Laundry Room
It’s true my The Hubbs thinks I’m a little CooCoo for decorating the laundry room but I was inspired by sooooo many of my bloggy friends and their neat spaces, I thought why not? Plus we were finally getting new appliances.
I will admit I don’t necessarily LOVE doing the laundry but it’s one of those things that has to get done and why not do it in a pretty space!? So here’s the BEFORE:


Our old funky washer and dryer. See my sad 1/2 attempt to organize with those green bins I stole borrowed from The Pookie Doo. And now the AFTER:

See those curtains? They used to be in my living room, they were in “going in yard sale pile” but I thought they’d be perfect for this space. PLUS I’d be being thrifty cause I wouldn’t need to go BUY more fabric! *High FIVE*

So the baskets, I found at Walmart $6 bucks each. My first thought was to buy wooden letters for the LAUNDRY sign but I all ready had brown vinyl so I used it and my Cricut Expression to make the signs and tags. I all ready had the Mason jar and clothes pins. The frame was $3 @ Michaels. OH the washer and Dryer! Geez, what got a good deal from The Home Depot. They were all ready 15% off and we got an extra 15% OFF!

Since the new set is “energy efficient” and we had leftover “non-energy effiecient” laundry soap. I thought it’d make a cute decoration. The rug, it came from Wal-Mart and guess what!? It was on clearance $15 from $25. I consider that a splurge but it was on clearance.

I attached velcro to the other 1/2 of the curtain and to the shelf to hide the tool box and The Hubbs work boots. There is still a little work to do on the wall where our freezer is but I’ll get to that later.

We live in military housing so I wanted everything to be moveable. Had this been a home I owned, I’d probably gone for installing cabinets. But this works!

Remember my subway art thingy! There it is. Also scapped a little backyard clothes drying scene with my Creative Memories Everyday Display. That’s a pair of jeans, a towel and a dress.
Thanks for stopping by!
Linked up to Remodelholic.com
Subway Style Wall Art

I’ve been seeing these subway art wall hangings all over the blogosphere. I decided a while ago I wanted to make one but couldn’t decide what kind or where to put it until……our dinosaur washer n dryer had finally pushed us to the limit and they had to go and I decided to pretty-up the our laundry room/closet/space er whatever.(more on the big redo later)


While at Michael’s looking at baskets for my laundry room/closet/space er whatever, I saw that the canvas’s were 50%- I love a sale! So I got one to attempt to make my own subway art.


I all ready had the die cut machine, paints, and vinyl so this was a $5 project! My kinda project!


I didn’t plan out where to put words. I just cut them out one at time and stuck em on the canvas. Turned out pretty good if I do say so myself! I’d like to mount it onto a darker piece of wood to make it really POP! We’ll see.
Slumber Party-Hollywood Style
%5B6%5D.jpg "IMG_8682 (683x1024)")
This past Saturday 2/19 my Munchkin turned 11 years old! I’m still trying to wrap my head around that. We started planning her party back in December. She decided she wanted a slumber party with a celebrity/super star theme. So I told her to go research and bring me her ideas. WOW! She came back with a 6 page written plan for her party that included: game ideas, food ideas , diagrams, invitation & goody bag illustrations, and websites for decorations…she had it all planned out!
%5B7%5D.jpg "IMG_8688 (683x1024)")

She chose Silver,Black, and Gold for the colors after finding these decorations at Partycity.com
%5B5%5D.jpg "IMG_8699 (683x1024)")
She’d done a Google search to get ideas on how to set up for the party and found these "Popcorn" cupcakes. Too cute, it’s not really Popcorn on top it’s mini marshmallows that you cut cross-wise and spray with yellow food coloring or Wilton Color Mist in Yellow. ")
")
%5B5%5D.jpg "IMG_8703 (1024x683)")
%5B8%5D.jpg "IMG_8701 (1024x683)")
This cupcake wrapper was made with my new favorite Cricut Accessory – Make The Cut software. I LOVE MTC! I will probably never buy another cartridge again! I used Stickles to outline & fill in the stars and 11.
%5B6%5D.jpg "IMG_8691 (1024x683)")
%5B6%5D.jpg "IMG_8695 (1024x683)")
Guess what I used to make this super cute banner?
Right!
Make the cut! Really, this software is Ah-may-zing! If you have a cutting machine!")
%5B5%5D.jpg "IMG_8694 (1024x683)")
Most of the decorations I got either on sale, with coupons or at the $1 store!
%5B5%5D.jpg "IMG_8705 (1024x683)")

For the goody bags,I bought plain black paper sacks from Michael’s. I traced and cut out the star shape then glued cut pieces of page protectors inside the bag. I LOVE to embellish so I used a paper trimmer to make the loops on the top of the bag. Munchkin cut out little stars to glue on the outsides and the clapboard tags were made with……….YUP MTC! So was the clapboard on the balloon center piece and the front door.

%5B6%5D.jpg "IMG_8708 (683x1024)")
The party was hit, the girls had a fun, there was pillow fighting, boy talk, movie watching, whip cream smearing, a hi fashion show and they designed their own T-shirts. They were 10 girls in all and they were all very well behaved.
The Pookie Doo has started planning her 7th birthday with a Pinkalicious theme! Her Bday is in September so this is going to be FUN! My orders were, “Mommy, EVERYTHING has to just be PINK!”

*Sigh* I love planning parties!
Lil PINK & White Desk Re-finished

My Lil E, LOVES herself some PINK! Any time she gets a choice of which color she wants for an item if it comes in pink-she always choosed pink. Well we've been hunting for a desk for her room for a while now. At first I was thinking of a old skool class room desk like this, I'd paint it pink ofcourse. Then I thought that was to small so I went looking online and found this desk at walmart and thought it wouuld be PERFECT! Well I put off ordering it for whatever reason. The Hubbs was off one Friday and happened upon a yard sale where he found the cutest little desk for $5! I couldn't believe it-either.
So here are the before and afters.
BEFORE
 I forgot to take a pic before I started sanding-OOPS!

AFTER
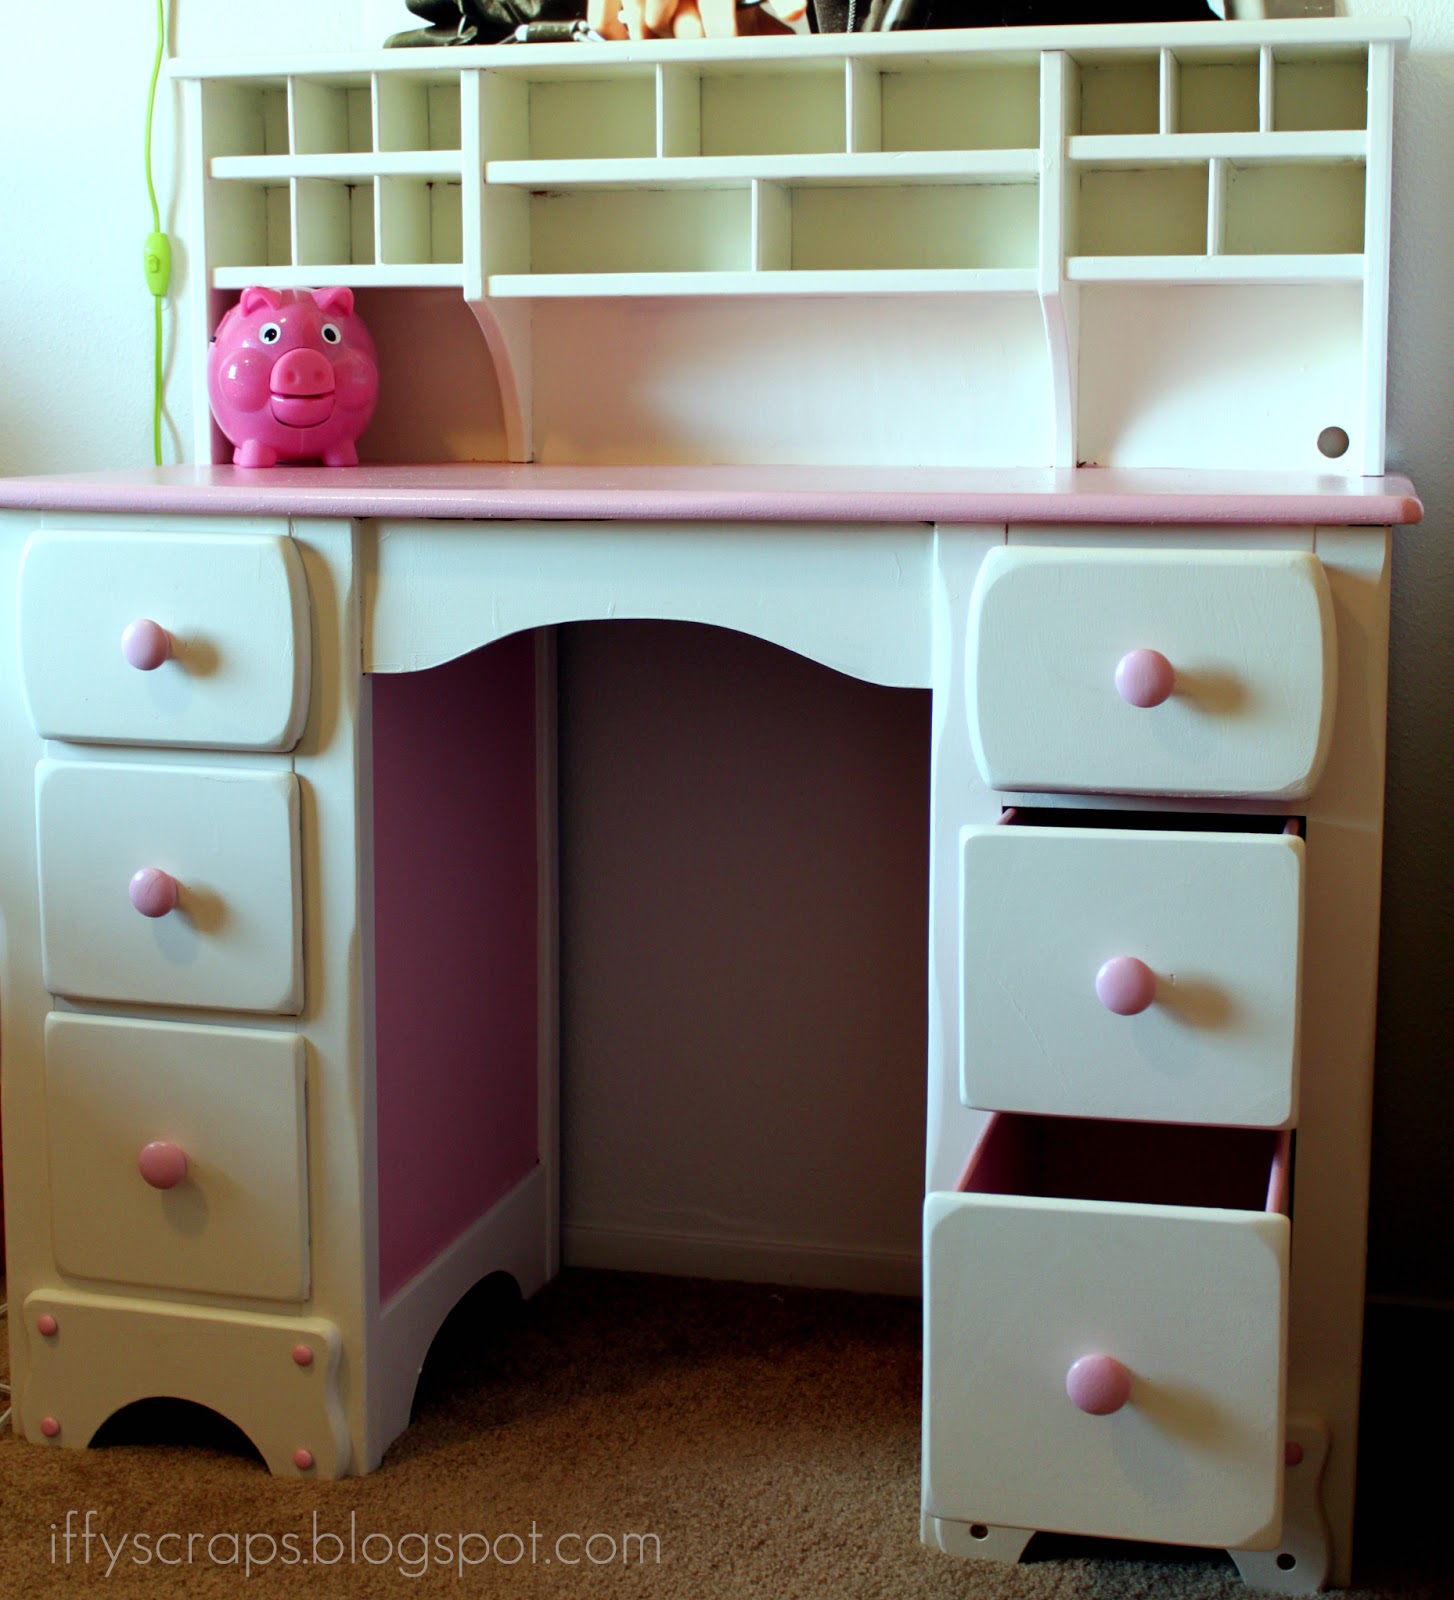
(gotta get two plugs for those 2 holes there)
All I did was sand it down so that there was no shine. This was impossible on the back of the hutch section so I went to my local Home Depot Store and instead of spray paint. I bought a 1 quart of the pink in a semi-gloss and 1 gallon of rhe white paint in a satin WITH primer in it! **genius**

(thought it was clever to paint the inside of the drawers pink)
It's a little more expensive but I'm a Lazy Crafter. I like stuff done quick & easy. So I painted the pink first, taped it off with blue tape then painted the white.
I also changed out the knobs it had long fat wooden ones I thouht these little round ones were cuter. This was my first time re painting a large piece of furniture and now I'm hooked...next on the list...the rest of the girls' room furniture, dinning set, and lawn chairs!
Total desk redo cost around $50!
TFL!
Pin It
Ruffled Camera Strap Slipcover Tutorial

I love anything that can be customized. Especially if I can do it myself! When I decided to buy my new DSLR Camera I knew I had to have a cutesy tootsey camera strap. The one that it comes with is wayyyyy to BORING! I love pinks, ruffles, flowers....okay you get the point I'ma girly girl! HA!
One Sunday night while The Hubbs watched football I sat down and made my slipcover. I was a little nervous because I've only used my sewing maching on to sew stitches on paper. So anyways here's what I made...my first but certainly not my last RUFFLED CAMERA STRAP SLIPCOVER:
Here's what I used:
2-3 different pieces of fabric at least 1/2 yard
sewing machine
pins
ruler & measuring tape
iron & ironing board
cardstock
camera strap

Here's what I did:
Measure your camera strap.

I measured the length and width then added 1" to each. So measurements were 25" x 2.75"

Fold the ends over 1/4" and press to help hem stay

Make sure your hem's match so that your two strips of fabric remain the same length. Sew and back stitch the beginning and ends.

Use a ruler and measure 1/4" in from the edges, You should have 2" in the middle

Sew one end of the two pieces together. It's helpful to pin the fabric together so that it doesn't slip around while your sewing. Back stitch the beginning and end.

Next cut your fabric to ruffled. This will need to be double the length of your strap. I cut a 42"x 1.75" strip.

Next I stitched a zigzag hem on my ruffle fabric. With the top of the fabric up so the zigzag shows. Then sew a basting stitch down the middle of your ruffle fabric. Pin one end to the base fabric and pull the strings at the end to make the fabric "ruffle"
here you will need to play with the ruffles to get them even

Pin the fabric down and sew a stitch down the middle

**TAHDAH!**

These fabric roses came from my scrapbook stash I just hand stitched them on.


Next I pined my ruffle over towards the middle of the fabric to avoid catching in the stitch (good idea but then it was hard to get the pins out form the inside-got pricked about 6 times! OUCH!)
Fold the to loose ends together, you will be looking at the underside of your fabric, sew a line all the way down. Back stitch the beginning and end.

AND VIOLA! Once you flip the fabric from inside out you get this!
TFL~Happy Crafting!
Subscribe to:
Posts (Atom)